Secure command-line connection
Connection to compute and storage servers is done through the SSH protocol that allows you to run commands on the remote servers and to transfer files to and from those servers in a secure way. The SSH protocol allows various types of authentications, the most common one being the use of a login and a password. However, it is also possible, and recommended, to use SSH keys that are more secure and more convenient. See SSHKeys for more information on that topic.
When you request a CISM account, you choose a password (which should be long and complex). You can then use that login and password to connect to the CISM servers and setup an SSH key pair by yourself for more convenient authentication.
When you request a CÉCI account, you are provided with a private SSH key that is protected by a passphrase that you choose. For help with your CÉCI account, please refer to the CÉCI documentation.
Warning
Some of the servers or services listed on this page are not reachable from outside the network of the university. When working from home or from abroad for instance, you should use the UCLouvain VPN or the CISM SSH gateway.
Connecting with the command line
Access and file tranfers to the SSH servers are done through the SSH protocol (ssh,
scp, rsync, sftp, or any graphical user interface built upon SSH:
MobaXTerm, Filezilla, Cyberduck, etc.).
The SSH protocol allows running Linux commands on remote servers through a Bash session. By contrast to a web service, you here have access to a bare command-line interface that might appear rebutting at first sight but actually allows very precise and efficient operations.
SSH basics
You will need a terminal emulator and an SSH client. Some terminal software come with a built-in SSH client, such as MobaXTerm on Windows. On Linux and MacOS, you can use the terminal that comes with the system and the built-in SSH client.
The first step is to start a Terminal session. A terminal is a piece of software that allows interacting with the computer through the keyboard by running commands and getting the results like you would have in an SMS thread with someone.
Your computer is probably already equiped with a terminal. If you have a Linux
laptop, look for Gnome Terminal, or Konsole. If you have a MacOS
computer, look for Terminal. If you have a Windows computer, look for
Command prompt.
Note
Linux and MacOS are both UNIX-like platforms, they will start a Bash-compatible shell by default. By contrast, Windows will start a DOS or a Powershell session. Should you want a Bash session in Windows, you will need to install or activate WSL.
Once the terminal is open, you can type in commands. To use the SSH client to connect to a machine, run the following command:
ssh CISMLOGIN@SERVER.cism.ucl.ac.be
Make sure to replace the part CISMLOGIN with your actual login and SERVER with the name of the computer you want to connect to.
Important
When you will connect for the first time, the program you are using most will ask you to verify the fingerprint of the public SSH key of the server you are trying to connect to. Ideally, you should contact the admins to verify that key. If you do not, please make sure that you are connected to a trusted network before answering ‘Yes’.
When you login, you will be asked for your password. You should then give the password you chose when you created your account. You can spare the need for typing the password at every login by using SSH keys. See SSHKeys.
Using SSH keys
Keys are more convenient (and also more secure if you additionaly disable password authentication) than passwords to access the CISM machines.
Assuming you do not have already an SSH key pair, the first step is to generate one.
Step one: Generate the SSH key pair
On your Linux or MacOs computer, issue the following command:
ssh-keygen -t rsa
You will be asked where to store the key, and to choose a passphrase. You can leave those options blank and just hit the Enter key. Make sure you do not overwrite any pre-existing key! As for the passphrase, it is best to choose one and then use an SSH agent and key ring as explained in the CÉCI website.
The above command hase created two files in your ~/.ssh/ directory:
id_rsa; andid_rsa.pub.
The former is your private key, which you must not share, and the latter is the corresponding public key, that will be copied to the servers you want to connect to.
Step two: Copy the key to the remote server
The public key should be copied to the ~/.ssh/authorized_keys file on the remote server. That can be done with
$ ssh-copy-id <my_cism_login>@<machine_name>.cism.ucl.ac.be
Make sure to replace the parts in <my_cism_login> with your actual login and <machine_name> with the name of the computer you want to connect to. You will be asked your password, and upon success, you will then be able to connect from your laptop to that server without entering your password.
SSH Client configuration file
You should furthermore configure your SSH client (in the .ssh/config file)
to avoid having to type your login and the full name of the servers each time.
See the documentation here for
instance.
Connecting with MobaXTerm
On Windows, an alternative to the built-in SSH client is to install (or simply download) MobaXterm. You can request it from the university IT support team, or install it by yourself, without admin privileges.
- Download and start MobaXterm
Go to the MobaXterm website and download the
free version. Make sure to select the  from the download
page. Create a
from the download
page. Create a MobaXterm folder on your Windows user Documents one and
uncompress inside it the contents of the downloaded zip file. We chose to
create the MobaXterm folder on that particular location and we will refer to
that on this guide. You can, of course, select some other location of your
preference if you wish. The steps showed here has been done with version 20.2
of MobaXterm. Some behaviors may change between version.
- Double click the
MobaXterm_Personal_XX.X.exeexecutable file inside the Documents\MobaXtermfolder. You should see the MobaXterm main window like this one:
- Click on the Session icon
 on the top left corner.
 - The Session settings configuration panel will open, select the
SSH session type
 and you should see a window like this:
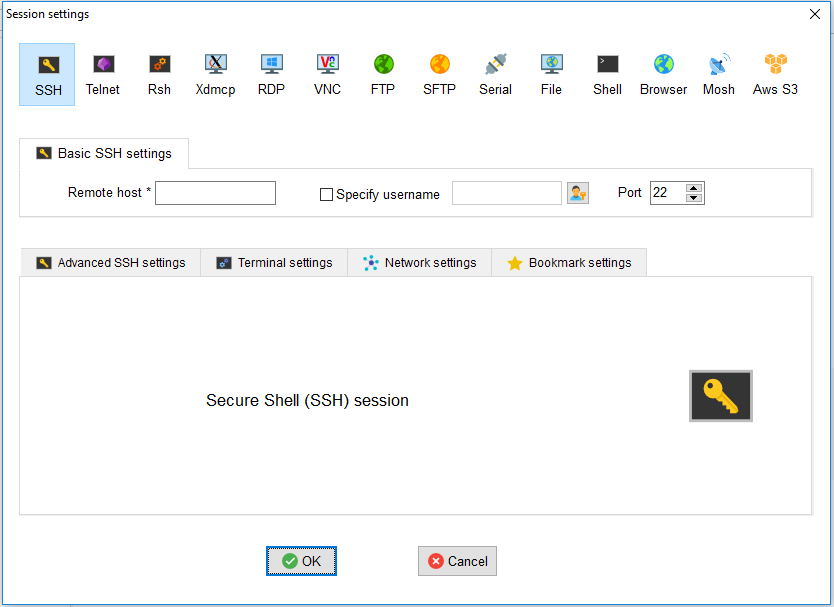
- In the Remote host field, introduce the full name of the server (interactive server or mass storage server) that you want to connect to. Tick the Specify username box and introduce your CISM username.
- Click the “OK” button and enter your CISM password when requested.
The first time, MobaXTerm will ask whether or not to remember the password. Alternatively, you can setup SSH keys that allow for more security and easier jumps from one server to another.
You are now connected and you can run commands.
- Copying files to and from the cluster
After you succeeded to setup the shortcut for connecting to a server you will see on the left sidebar on the Sftp tab a file browser on the server you are connected to.
You can simply drag and drop files from your computer to that panel and they will be copied to the cluster. The same is valid for retrieving files from the cluster to your computer.
If you right click on that panel, you will see different options to interact
with the browser (see the figure below). Remember always to press the Refresh
current folder button after you copied something or a new file or folder
is created on the cluster.
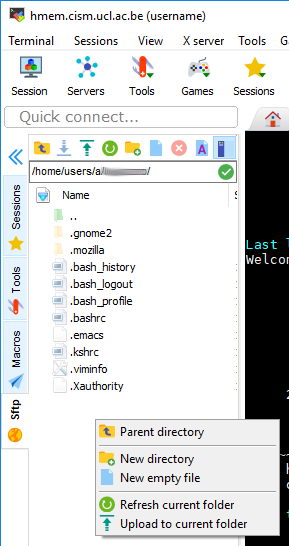
Note that you also have the right-click options directly available through the icons on the toolbar at the top of the panel.
For more information, please refer to the MobaXterm documentation.
Running programs
Programs that are run from the SSH command line will be killed whenever the SSH connection is lost, which can happen from a loss of network connectivity, a laptop crash or shutdown, etc.
Multiple solutions can be resorted to, based on the nohup or the disown
Linux commands, but the most user-friendly way to address the issue is to use a
terminal multiplexer
such as Tmux (most recent and
feature-full) or Screen (more
ancient but more widely available). Zellij or Zmx are also viable alternatives.
The way they both work is that the first time you start working on a remote
computer, you start a Screen or Tmux session by running the corresponding
tmux or screen command followed by ENTER. Make sure that command is run
on the remote computer and not your laptop or local workstation.
The screen will blank, and you get the prompt back where you can work as usual
and run the commands you want. Then, at some point, when you want, you can
detach from the session. With Screen this is done with CTRL-a d i.e. press
and hold the CTRL key and the a key at the same time, then release both and
hit the d key. Actually all “actions” in Screen are prefixed with the same
CTRL-a sequence. Tmux works exactly the same way except you need to do it
with CTRL-b d so the prefix for Tmux is CTRL-b. You will then come back
to the session from which you started the multiplexor, recovering what was
displayed on the screen at the time.
You can then disconnect from the remote computer; your program will keep running.
Later on, you can reconnect with SSH to the remote computer and re-attach to
the Tmux or Screen session. This is done by running the screen -r command or
the tmux a command depending on which program was used in the first place.
Then, your screen blanks and you get the session in which your long-running
program is running.
The nice thing is that this process will work even if you did not detach safely and your laptop crashed instead. You can simply SSH back to the remote computer again and re-attach to the session.
You can actually start multiple sessions on the remote commuter and name them.
You can list the running sessions with screen -ls or tmux ls. You will
find more information on the respective manual pages of both commands : man
tmux or man screen. An example with screenshots is also available in the
slides of the CISM/CÉCI training sessions dedicated to Matlab for which a video is also
available.
While both Scren and Tmux do a good job at protecting running programs from disconnections, there are a few caveats you must be aware of.
Scrolling in both is a more complicated than using the scrolling wheel of the mouse or using the scroll bars of the terminal window. It can work but requires slightly more configuration.
Copy/pasting with the mouse also does not work out of the box and requires specific configuration.
Graphical programs are not design to work with terminal multiplexer. In such cases, other solutions like VNC must be pursued.
Note that to run programs that require a graphical user interface (GUI), you will need to use the -X option of the ssh command to enable X11 forwarding.
The -X option allows using software with a graphical user interface (GUI). You can ignore it if all you need is a command line interface (CLI).
On MacOS, you will need to install XQuartz for this to work. On Windows, you will need XMing.